Tuesday, May 20, 2014

The Bondage Hanger

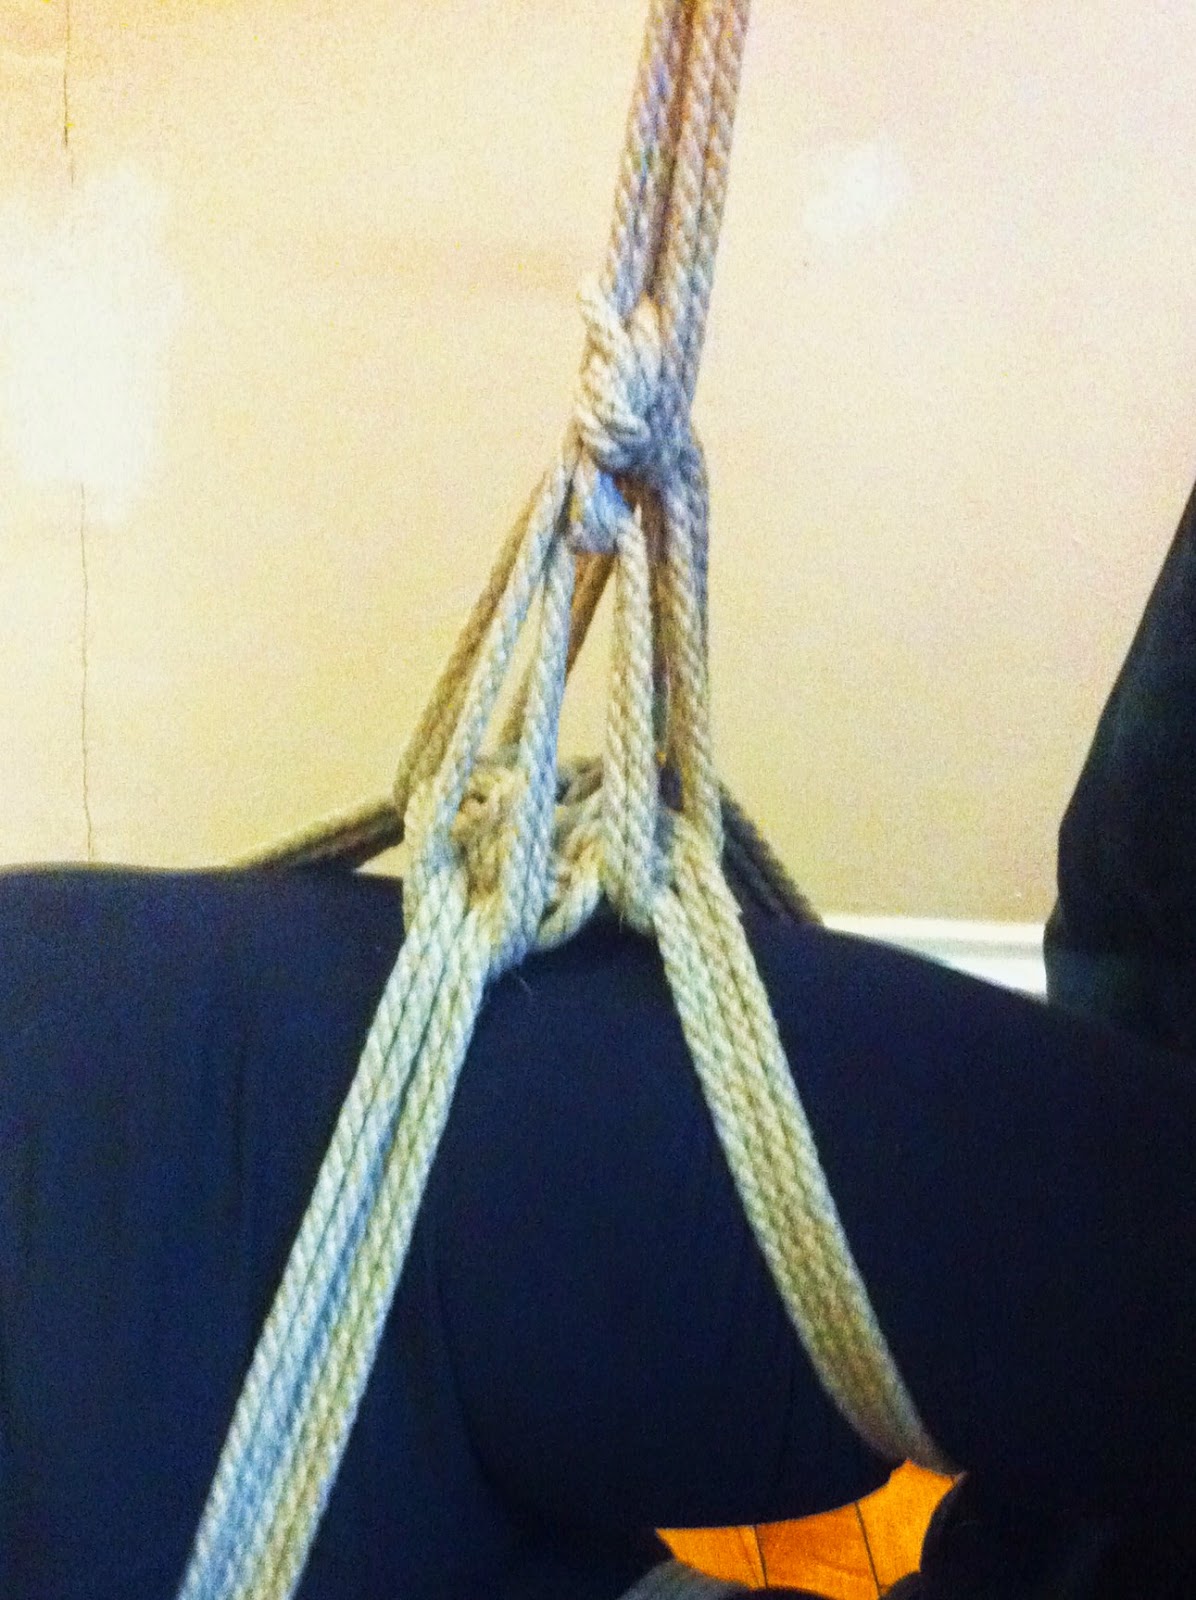
We learned the Bondage Hanger from Lord Percival, one of the icons of the New England rope scene, years ago. It is a great way to secure a top line to a suspension. It is very secure when tied properly and also helps to distribute the load well. One of the best applications of the Bondage Hanger is when you are tying two bands that need to be kept apart, such as doing a side suspension with the arm bands on a takate kote. It really excels in those situations. 

## PLEASE READ## This tutorial presents a method to secure a top line to rope work to do suspensions with. DO NOT do any kind of suspension work if you have never done so before and are not working with qualified instructors to learn how to do it safely and properly. Suspensions are seriously risky business and you need to work with people who can teach you the risks. It needs to be done IN PERSON with someone who knows what they are doing. ##

Having said that, this is a good tie to learn and practice with in preparation for learning how to suspend. Please learn from local experts before attempting any suspensions though, for your safety and more importantly for the safety of your bottom. 

The reason the Bondage Hanger is presented here is to show how to rig the Basket Weave Hip Harness.

Start by tying the Basket Weave Hip Harness

Bring the bight of your rope under the lower band on the outside of the harness. 

Bring the bight under the upper band but keep some slack in it so that you have a "U" shape of rope. 

Bring the bight over the "weave" leaving another "U" of rope the same size as the original.
Bring the bight down under the lower band of the harness then under the upper band but leave another "U" of rope between the two bands.
## Note that while you are doing this you will have had to feed some rope through the bands that are already in place##

Adjust the three "U"s so that they are all the same size and are in parallel with one another. Then bring your bight (under the red circle) down next to them. 

This is how it should look from the side. 

Form a loop with the tails (seen here with the red arrows). Pull the bight through the loop (green arrow).
Pass the bight back underneath all of the bands of the hanger then back up through the loop formed by the standing line. 

Pull the loop tight  leaving the bight free (the bight is under the red circle)
##Please note: this is a Boola Boola single column tie. Any forward tension single column tie can be used to finish a bondage hanger- the Boola Boola, Wyk'd Dave Wyk'd Fast Bowline, Somerville Bowline or Burlington Bowline all work well. The Boola Boola was done to show it quickly##

This step is CRITICAL!!! Take the tails of your rope and pull it through the bight. This secures the tie so it cannot come undone. If you are to have a person suspended you should always do this to top lines to help eliminate risk!!!!

This illustrates the tails pulled through the bight. 

This is the really fun part with the bondage hanger on the Basket Weave Hip Harness- it works like a rope holster!  Take the tails and loop them in your hand so that they are parallel to one another.

Fold the loop in half as shown. 

Fold the loop in half again. 

Stick that bundle of rope into the middle of the bondage hanger. 

If you have done it correctly then it will look like this. Now check out the cool video of what you can do with it when you have put it in the "rope holster". Very fun!

This is what the finished bondage hanger looks under tension supporting weight.
## Again, do not use this to suspend unless you have been properly instructed##


Monday, May 12, 2014

The Triple Column Tie


Since most of you are familiar with the single and double column tie already I thought I'd explain how to expand that into a triple column tie. This can be really useful when tying up someone with shoulder or wrist issues or limited flexibility in the arms. You can use this as your starting point for building a Takate Kote or "Box Tie" rather than tying the wrists behind the back.

Monday, May 5, 2014

The Spinout Munenawa

 
Hi again rope fans,

  This week we're taking a look at my new flashy chest harness for public performances called the Spinout Munenawa. We combine a double column wrist tie (here I used the Infinity Cuff) with a clove hitch around the torso, throw a daisy chain in for a quick release, and finish with a simple chest piece held in place by friction. Remember to tie this one snugly to keep it from falling off. Also, provided that you tie off the tails when you're finished, this harness is quite sturdy, and should be up for any kind of floor play you might have in mind as long as it relies on the chest bands only. Obviously, the shoulder straps can easily come loose, so don't rely on them for anything weight bearing. Now get out there, tie this harness, and wow your friends at your next party!

  Happy tying,
    ~Tracker

Monday, April 28, 2014

The Infinity Cuff

A couple of months ago I was playing with some rope with my partner and I came up with this fun little double column tie that works out really nicely! It is very quick to tie, totally secure and looks pretty good ta boot... This tie is a great way to start off a lot of other ties, especially if the hands are going to be bound behind the head. 

The name of it comes from the fact that the two loops formed look like the infinity symbol. 

(A quick note- I don't want to assume that I am the first person to come up with this tie so please let us know if you have seen it before. We definitely want to give credit where credit is due)


Drape the rope over one thumb as shown. It is important to have the bight (mid-point) hanging down and in front.


Pull the line through the bight but keep a loop formed with your thumb.

Pull a doubled bight through the bight that was hanging there. Do not pull the rope all the way through. 

Form this arrangement with the rope so that you have two loops. 

Into those two loops place the columns (in this case wrists). A motion pulling down will tighten the cuffs. 

Tighten the cuffs so that they are secure but not too tight. You should be able to fit a finger or two between the rope and the wrist (or other column).

Form a bight with the rope up above the mid point in the cuffs. 

Pull the tails of the rope through the bight that you formed. 

Pull tightly and you have completed the Infinity Cuff!

Monday, April 21, 2014

Improved Foot Torture Tie

I came up with a simplified version of the foot torture tie since the last time I posted on the subject a few weeks ago. You can make this as mean as you want simply by adding more passes underneath the foot and placing knots on top of each other or along the arch of the foot. You can experiment with different rope widths as well. In this video I'm using 8mm rope so I only needed to go under the foot twice to build up a pretty bulky knot. You can also use 4mm rope and have your rope bottom wear this tie while in heels. This could be a fun way to spice up your evening out on the town ;) Have fun!


Tuesday, April 15, 2014

The Basket Weave Hip Harness (aka- the Han Solo Gunslinger)

The "Han Solo" Gunslinger (thanks to the lovely Anise for the gorgeous hips)
In March I taught a class at Bound in Boston that was just hip harnesses. The class was packed and I had a great time teaching. One of my favorite hip harnesses to teach was this one- the Basket Weave or, as we call it, the Han Solo Gunslinger. Why the Han Solo? Because it hangs low on the hip just like Han's blaster rig does (Han did shoot first...)

This hip harness is really cool- it looks awesome, is fast to tie and has NO KNOTS! Pretty awesome huh? There are a few downsides- if it isn't tied fairly tightly it can and will move. If it is used in a suspension there is a specific method of tying into it that should be done (which will be featured in a future posting) and it should have an additional leg wrap on the opposite leg for support during suspensions. It is always best to know the limitations of a tie as well as the benefits (I might even argue that is it more important to know the limitations, but that is my opinion). 

A 30 foot rope was used to make this harness on my bottom. Some may require less rope, some may require more rope. If you do need more then refer to our earlier post about joining rope.

A thank you goes out to Lord Percival (aka Percy) for showing me this hip harness!

So here it goes!

The first thing you need to do is to locate the hip bones. The harness needs to be seated firmly on the hip bones
so that it doesn't slip up into the soft tissue above. Gently pressing into your partner's hips will help you locate where you need to locate the harness. It also helps build the connection between  you and your partner if you are doing it right. 

Wrap the rope around the hips and bring it through the bight (mid point loop) of the rope. Place the bight where you want the hip harness to end up. I chose to go for the mid point of the thigh. That is probably the best placement for this harness. 

Wrap the rope firmly around the leg between where you want the harness to be located and the knee. Note that the rope is firmly in the bottom's skin. It should not be so tight as to restrict circulation but it should be tight enough that it will not move easily. 

Continue the rope up around the backside of the leg and crossing over the original path of the rope. The rope then goes up around the hips again on top of and parallel to the first pass. It then comes back down and goes over the first band it crosses then under the second band. 

The rope then follows the first pass around the leg then up to the bands again. Here you will start another weave but it needs to be the opposite of the first weave so it goes under the first band and over the second. The rope continues up around the hips again. 


When the rope comes back down to the meeting point you weave again- doing the opposite of the last pass. In this case it is over, under over.  Then the rope turns and goes under then over. 

Things get a little funky here because of earlier weaving. To continue to get opposite weaving on the ropes that you are working with you will need to repeat over under on the next pair of bands. It looks kind of funny but it is stronger to have the opposite weaving like that. 

The rope then weaves over, under over.
(please ignore the weird grey arrow that I didn't notice was there when I was editing- these are not the droids that you are seeking...)

You see the pattern yet? Here the weave goes under, over, under, turns then over, under and I am left with a couple of inches of extra rope. 

Take those extra inches of rope and tuck them up underneath the lovely weaving pattern you just made!

Here it is! A killer hip harness with no knots! Pretty cool huh? The weaving is what gives this hip harness its strength. Because of the amount of weaving that takes place this works with ropes that have less friction such as nylon and MFP quite well too. Synthetic ropes like that may have more of a tendency to slip on the skin though so please take that into account if tying with it. 


Monday, April 7, 2014

The Disappearing TK

Hi everyone- this is Lux posting for Tracker this week. He's across the pond making the world a safer place for bits and bytes. In his stead, I present... The Disappearing TK! Tracker reverse-engineered this tie after watching this performance: http://youtu.be/tVSqB1EDlug. Thank you Mr. Oink Oink for bringing it to our attention and asking if Tracker could figure out how this tie was created.

There will be a prize for anyone who posts a video of themselves doing this tie successfully with more pinache than our very own Tracker (good luck, suckahs!).

This week's corny jokes brought to you by Professor Oni. Enjoy!